quick tip, check you have the razor page specification in the web.config, otherwise you receive the error in the title. Reason being, you've turned it into webforms !
<configSections>
<sectionGroup name="system.web.webPages.razor" type="System.Web.WebPages.Razor.Configuration.RazorWebSectionGroup, System.Web.WebPages.Razor, Version=1.0.0.0, Culture=neutral, PublicKeyToken=31BF3856AD364E35">
<section name="host" type="System.Web.WebPages.Razor.Configuration.HostSection, System.Web.WebPages.Razor, Version=1.0.0.0, Culture=neutral, PublicKeyToken=31BF3856AD364E35" requirePermission="false" />
<section name="pages" type="System.Web.WebPages.Razor.Configuration.RazorPagesSection, System.Web.WebPages.Razor, Version=1.0.0.0, Culture=neutral, PublicKeyToken=31BF3856AD364E35" requirePermission="false" />
</sectionGroup>
</configSections>
<system.web.webPages.razor>
<host factoryType="System.Web.Mvc.MvcWebRazorHostFactory, System.Web.Mvc, Version=3.0.0.0, Culture=neutral, PublicKeyToken=31BF3856AD364E35" />
<pages pageBaseType="MyPageBaseType or razor page">
<namespaces>
<clear/>
<add namespace="System.Web.Mvc" />
<add namespace="System.Web.Mvc.Ajax" />
<add namespace="System.Web.Mvc.Html" />
<add namespace="System.Web.Routing" />
<add namespace="System.Web.WebPages" />
<add namespace="System.Linq"/>
<add namespace="System.Collections.Generic"/>
<add namespace="DrFoster.Rtm.Ui.Resources" />
<add namespace="DrFoster.Common.Extensions" />
<add namespace="DrFoster.Common.Web.MVC" />
</namespaces>
</pages>
</system.web.webPages.razor>
Thursday, 21 June 2012

Thursday, 14 June 2012
Resource not found 404 in MVC 3 at root level with IIS
Really annoying one this, IIS the other day was giving me the all too familiar 404 rescource not found at the root level when requesting my default path on an MVC 3 site. If you haven't checked:
See if you can server any page from that address (any html page). If this throws the same error, check the permissions settings for your site as I did this and it works. Hope this helps somebody out there !
See if you can server any page from that address (any html page). If this throws the same error, check the permissions settings for your site as I did this and it works. Hope this helps somebody out there !
Tuesday, 15 May 2012
Installing Weinre and getting it going on a mac
Introduction
Hi following on from a recent blog post regarding getting phonegap/cordova and sencha 2 working nicely together, I thought it may be prudent to do another blog regarding the debugging of these using weinre which is just awesome. So here goes....
for this we are using Mac os.
Downloading Weinre
Start by downloading the weinre application from :
(thanks to Kerri Shotts on the phonegap forum for this link, much appreciated !)
I went to the 1.x directory and got the latest 1.6 zip file
so unzip the files to the directory of your choice.
Server.Properties
OK i'm a bit of a muppet when it comes to MAC OS as I have been a windows developer all my life (sorry guys but Visual studio really is a lot easier to use but thats my humble opinion) but one thing that had me puzelled and it was down to my lack of understanding of MAC OS. We need to create a server.properties file under root/.weinre. before we do this, do yourself a favour and open a terminal and show all hidden files like so:
defaults write com.apple.Finder AppleShowAllFiles TRUE
Then kill all finder apps:
killall Finder
And when you open finder again, under yourmacname/users you will find the .weinre directory.
The server.properties file contains which ipaddress are used to communicate with the simulator and weinre. If you need to find the ipaddress of your machine, open a terminal type ifconfig which will give you your ipaddress.
ok, create your server.properties file in the .weinre directory, with the following:
boundHost: 192.168.1.3
httpPort: 8080
and save. Start weinre and you should be able to navigate to:
http://youripaddress:8080/target/target-script-min.js
and view the file.
Debugging
Ok, time for a test drive. I have an XCode project which i run in the simulator. So start Weinre and then run your XCode project in the simulator.

I get white list errors. So go to your project directory and find the plist file for your application:

Open this with XCode and you will see a external hosts entry, add your ip address to this list :

After this, start weinre if not started then your simulator. You should now be able to use the debugger and set stuff in weinre and these are reflected in the simulator ! have fun !
Friday, 11 May 2012
Getting Sencha Touch 2 and PhoneGap Cordova to work in XCode
Seems there are a lot of questions regarding this one. Having done it myself and have got it working. Thought I would share the experience. First, what I am using :
IMac with OSX Lion and XCode 4.4
Sencha Touch 2 (obviously)
PhoneGap 1.7 (now cordova)

IMac with OSX Lion and XCode 4.4
Sencha Touch 2 (obviously)
PhoneGap 1.7 (now cordova)
What to install
- OK, start with downloading and installing XCode 4 this means going to: https://developer.apple.com/xcode/ to get the latest
- Next download and install phone gap from http://phonegap.com/
- Create your projects directory (mine is aptly called 'projects')
- Next download sencha touch 2 http://www.sencha.com/products/touch/ and pop that in the projects directory
- finally, download and install the sdk tools at http://www.sencha.com/products/sdk-tools
Create the phonegap project
First i am going to create the Phonegap/Cordova project. So start up Xcode, create new xcode project and select 'Cordova' for the project template (MyApp is my project name). Give the project a run on your chosen emulator (I have chosen the IOS Emulator 5.0) you will be greated with the infamous :

OK, When you run the application, the result was a www directory being created. You can see this if you select your project in xcode and right click show in finder:


I have also commented out the code between the body tags (the hey its cordova) etc....
I have then modified OnDeviceReady to:


Here's the project directory:
You need to drag the www folder from the finder window onto the project in XCode and select the 'Create references' radio button if not selected (second in the list) which leaving all the others unselected
Run your app again and you should get :

Hurrah thats the first part.
Adding your Sencha Project
OK. We are now going to add the sencha project. First of all, I am going to rename the Index.html in my current project to phonegapindex.html
I then open a terminal and cd into my sencha 2 sdk folder (this is the SDK folder and NOT the tools directory) and type the command:
sencha generate app app ../MyApp/www
A little confusing perhaps as I have named the sencha app 'app' so the command is sencha generate app
then the app name (in my case 'app') I have then told it to generate this in myApp/www
if all goes well:
and you now have an app directory within your www directory with an mvc sencha 2 app.
Getting it all to work
I am now going to rename the index.html generated by the sencha command to senchaindex.html and the phonegapindex.html back to index.html
What I am going to show you is the basics of getting phonegap calling our ext application. its up to you to go on and experiment.
I've added, the sencha libs, the app css, our app.js file and the main view
<script type="text/javascript" charset="utf-8" src="sdk/sencha-touch-all.js"></script>
<link rel="stylesheet" href="resources/css/app.css">
<script type="text/javascript" charset="utf-8" src="app.js"></script>
<script type="text/javascript" charset="utf-8" src="app/view/main.js"></script>
so a snapshot of the top part of my code:

I have then modified OnDeviceReady to:
function onDeviceReady()
{
loadApp();
// do your thing!
//navigator.notification.alert("Cordova is working")
}
As you can see I have stubbed out the original app creation and replaced with a very simple implementation just to get us started. Dont forget the sencha touch 2 is mvc based so we add our main view to the viewport. you can get the name of the view by looking in the views directory at main.js and the define statement indicates what view needs to be added.
If all goes well, you should get the following when you run the app in the simulator:

haza !
Testing the Theming
Before we going any further with theming, please make sure you have the compass installed and the sass compiler. Open a terminal window and type:
$ sudo gem install haml
$ sudo gem install compass
so as a quick check, lets try changing the base colour. under the resources/sass directory you will find app.sass add the following to the top of the file above all the other import lines
$base_color: #FF0000;
We now need to recompile the sass, I like to remove the app.css from the resources/css directory for the first time just to prove it is working.
open a terminal and navigate to your projects directory/www/resources, if you overwrite, you will see:
then run your app once more and you should be greated with a red version of your sencha app.
Hope that helps you all out there !
Thursday, 29 March 2012
SqlServer CE and EF 4.1 DB first.... its been emotional
Just wanting to spread the love here as there has been swearing, bouts of nervous laughter and stroking a firearm whilst muttering "the day of reckoning is upon us" but I have finally got a unit testing environment working with SQLServer CE, Entity Framework 4 and a DB first model.
Would just like to mention Nick Mayne who introduced me to SQLServer CE. check his blog out http://themayneissue.com/ he also works on the great orchard CMS project for MVC which is definitely worth taking a look at http://www.orchardproject.net/
If you're interested, read on ....
We are using the northwind database and the POCO templates for the entity framework so if you haven't already done so, you will need to download the northwind samples and the POCO templates which can be found at :
http://visualstudiogallery.msdn.microsoft.com/23df0450-5677-4926-96cc-173d02752313
Then open Visual Studio.

This then prompts you to generate from db or empty, i'm choosing empty..

_2012-03-29_21-22-11.png)
_2012-03-29_21-23-24.png)
_2012-03-29_21-25-34.png)

_2012-03-29_21-32-11.png)


_2012-03-29_21-32-11.png)

Would just like to mention Nick Mayne who introduced me to SQLServer CE. check his blog out http://themayneissue.com/ he also works on the great orchard CMS project for MVC which is definitely worth taking a look at http://www.orchardproject.net/
If you're interested, read on ....
We are using the northwind database and the POCO templates for the entity framework so if you haven't already done so, you will need to download the northwind samples and the POCO templates which can be found at :
http://visualstudiogallery.msdn.microsoft.com/23df0450-5677-4926-96cc-173d02752313
Then open Visual Studio.
Create the data class library
In your solution add a new class library project. Then add a new a new item and select Entity Data Model like so:
This then prompts you to generate from db or empty, i'm choosing empty..

I now have the following solution structure:
Now select your Edmx and right click in the pane and select Update Model From Database
_2012-03-29_21-23-24.png)
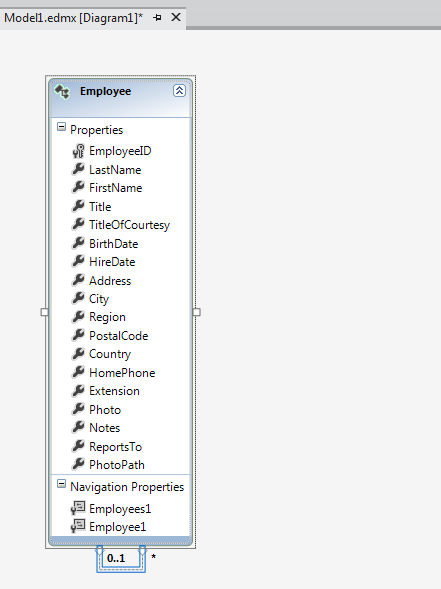
and then set the connection string and add a couple of tables. My edmx now looks like this (i've added the northwind-employees table)
_2012-03-29_21-25-34.png)
To add the POCO generation, right click in the edmx white pane and select "Add Code Generation Item" and select the POCO template:

This then creates your context and tt files required for generating the entities code. Save you EDMX and close then select the model.context.tt and right click and select "Run Custom Tool" as you can see I now have the employees entities generated in the project :
_2012-03-29_21-32-11.png)
Ok, so now we have a model to test ! next lets use SQL SERVER CE to test it. What we are essentially going to do wrap the object context in a db context in order for us to be able to test our repositories. So lets get started.
Create a new unit test project, you have guessed by now I am using the new hideous VS 11 IDE...

We then need to add 3 packages, EntityFramework, the SQLServer CE installation and the entity framework package. Firstly, with your new test project selected, select Manage NuGet Packages and select the online option and search for entity framework.

Then hit install, this will add the libraries to the test project, next select manage nuget packages again and search for SqlServerCompact and install:
_2012-03-29_21-32-11.png)
Finally, you will need the entity framework sql package:

And we are good to go.
First we need to add a new class that effectively "Wraps" the object context. So I will add a new class called ObjectContextWrapper.cs
We start by fleshing out the code and accepting the object context in the constructor along with a dbconnection (you will need to add references to your data project, system.data, system.data.common and entity)
We basically wrap the context and the entities available in the normal object context. We override CreateDatabaseScript and pass this to the object context and then provide the same method in the object context to get the employees. Our code for the wrapper looks like so:
public class ObjectContextWrapper : DbContext
{
Model1Container _objectContext;
public ObjectContextWrapper(Model1Container objectContext, DbConnection connection) : base(connection, true)
{
_objectContext = objectContext;
_objectContext.ContextOptions.LazyLoadingEnabled = false;
}
public string CreateDatabaseScript()
{
return _objectContext.CreateDatabaseScript();
}
public IDbSet<Employee> Employees
{
get { return this.Set<Employee>(); }
}
}
Finally, you add the unit test, sorry I have put all the setup in the test, this would ideally go in TestInitialize
[TestMethod]
public void TestMethod1()
{
MetadataWorkspace workspace = new MetadataWorkspace(new string[] { "res://*/" }, new Assembly[] { Assembly.GetAssembly(typeof(Model1Container)) });
Database.DefaultConnectionFactory = new SqlCeConnectionFactory("System.Data.SqlServerCe.4.0");
//Database.SetInitializer(new
ObjectContextInitialiser ());
DbConnection connection = new SqlCeConnectionFactory("System.Data.SqlServerCe.4.0").CreateConnection("SqlServerCEDB");
EntityConnection entityConnection = new EntityConnection(workspace, connection);
ObjectContextWrapper context = new ObjectContextWrapper(
new Model1Container(entityConnection), connection
);
Employee emp = new Employee() { EmployeeID = 1, FirstName = "Andrew", LastName = "Smith" };
context.Employees.Add(emp);
context.SaveChanges();
Employee newemp = (
from d in context.Employees
where d.EmployeeID == 1
select d
).Single();
Assert.AreEqual(newemp.EmployeeID, emp.EmployeeID);
Database.Delete(connection);
}
Bit of explanation needed here. Firstly, I tried a few different ways to work with the context but wanted to pass our object context an entityconnection as it seems the easiest thing to do.
To create an EntityConnection, we need a db connection and a metadata workspace, so we create the metadataworkspace using the assembly where the object context can be found and a simple resource string.
We call the SQLCE connection factory to get a dbconnection and then create the Entity connection using these two items.
we pass our wrapper the connection and the model container (ok I pass the connection twice, we can tidy that up I guess but its late)
We then create an employee and add it to tour wrapper class (remember we have an employees property)
we then save the changes.
to test, we get the employee back and perform an assert
if you comment out the Database.Delete and check the test bin directory, you will find the sdf database file. and hey presto ! unit test with SQLServerCE
Initialising with some data
We can initialise the data with the setInitializer method on the database object, we first write the initializer:
public class ObjectContextInitialiser : DropCreateDatabaseAlways<ObjectContextWrapper>
{
ObjectContextWrapper _objectContextWrapper;
protected override void Seed(ObjectContextWrapper context)
{
_objectContextWrapper = context;
var Employees = new List<Employee> {
new Employee() { EmployeeID = 500, FirstName = "test", LastName="name" }
};
Employees.ForEach(d => _objectContextWrapper.Employees.Add(d));
}
public IEnumerable<Employee> Employees
{
get
{
return _objectContextWrapper.Employees;
}
}
}
This simply creates a seed method to populate the context with an employee and a convienience method to get the employees from the context so we can compare in the unittest.
We can then uncomment the line :
//Database.SetInitializer(new ObjectContextInitialiser ());
and the db is populated.
If you find this useful, drop us a line
Friday, 24 February 2012
MVC and IEnumerable Razor woes
Quick one we come across and I have come across before so should be beaten with a large stick for forgetting it. If you have an IEnumerable model type i.e. your declaration looks like :
@model IEnumerable<Spatula>
then you try and loop through this:
@foreach (Spatula s in Model)
you get an error regarding the model not being the correct type (cannot get IEnumerator from object type)
remember to cast the Model to an IEnumerable like so :
@foreach (Spatula s in (Model as IEnumerable<Spatula>))
Presto. just a little thing if you forget.
@model IEnumerable<Spatula>
then you try and loop through this:
@foreach (Spatula s in Model)
you get an error regarding the model not being the correct type (cannot get IEnumerator from object type)
remember to cast the Model to an IEnumerable like so :
@foreach (Spatula s in (Model as IEnumerable<Spatula>))
Presto. just a little thing if you forget.
Thursday, 16 February 2012
VS2010 cannot add reference
If you have seen the all too infamous "Cannot add reference" in visual studio and gone down the usual route of making sure you have added the project to the solution, added necessary files, shaking the P.C. and performing a druid ceremony and it still doesn't work, I may have another one for you that I encountered today whilst at work.
At our place, we have a job service solution which is a windows service and a large number of projects which are the individual jobs. All the settings for configuration are naturally on the service solution e.g. we have a configuration in the job service solution of dev, preprod, release, SIT and UAT. The job service solution has all the projects for each job and the tests so its pretty large.
We also have solutions which have groups of jobs so we can work on the smaller projects and tests without having to recompile the whole service unless we are deploying the whole thing. We did a bit of a tidy up so the service solution had the configrations but our other solutions only had debug and release as we didn't need them.
I didn't check the jobservice solutions selected configuration and tried to add an exisitng project and received the all too familiar "cannot add reference" due to the project that was being added having no matching configurtion.
Even worse if you try and add a reference to an existing project that is in the solution which was there before you deleted the configurations you cannot add that either even though its sitting there. What followed was a great deal of head scratching and WTF moments.
If all else fails and you are getting this issue or other bizarre behaviour, check the configurations that each project has against the main solution and you may find there is a bit of a mismatch.
At our place, we have a job service solution which is a windows service and a large number of projects which are the individual jobs. All the settings for configuration are naturally on the service solution e.g. we have a configuration in the job service solution of dev, preprod, release, SIT and UAT. The job service solution has all the projects for each job and the tests so its pretty large.
We also have solutions which have groups of jobs so we can work on the smaller projects and tests without having to recompile the whole service unless we are deploying the whole thing. We did a bit of a tidy up so the service solution had the configrations but our other solutions only had debug and release as we didn't need them.
I didn't check the jobservice solutions selected configuration and tried to add an exisitng project and received the all too familiar "cannot add reference" due to the project that was being added having no matching configurtion.
Even worse if you try and add a reference to an existing project that is in the solution which was there before you deleted the configurations you cannot add that either even though its sitting there. What followed was a great deal of head scratching and WTF moments.
If all else fails and you are getting this issue or other bizarre behaviour, check the configurations that each project has against the main solution and you may find there is a bit of a mismatch.
Subscribe to:
Posts (Atom)